申请免费的MongoDB云数据库
1、注册登录
打开mongodb官网并注册登录,免费的MongoDB云数据库有512MB大小。
2、选择并配置
在项目页面点击Create a New Cluster按钮
如图: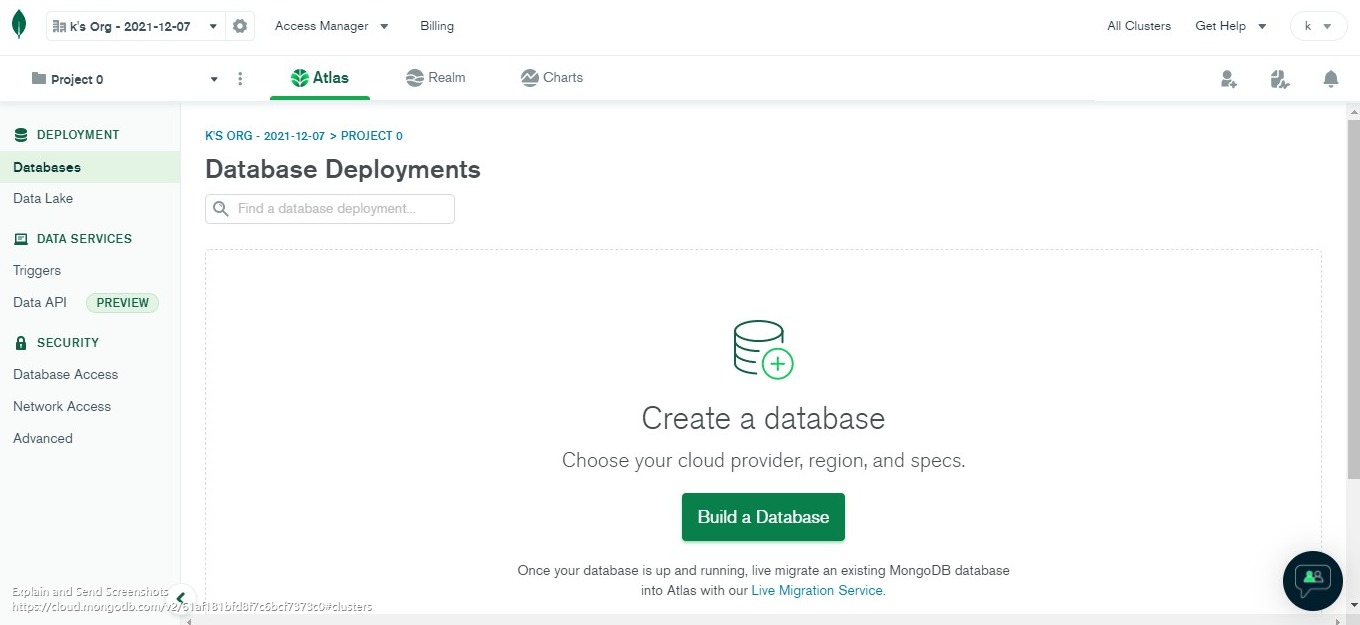
可参照下图进行配置,如下列图示: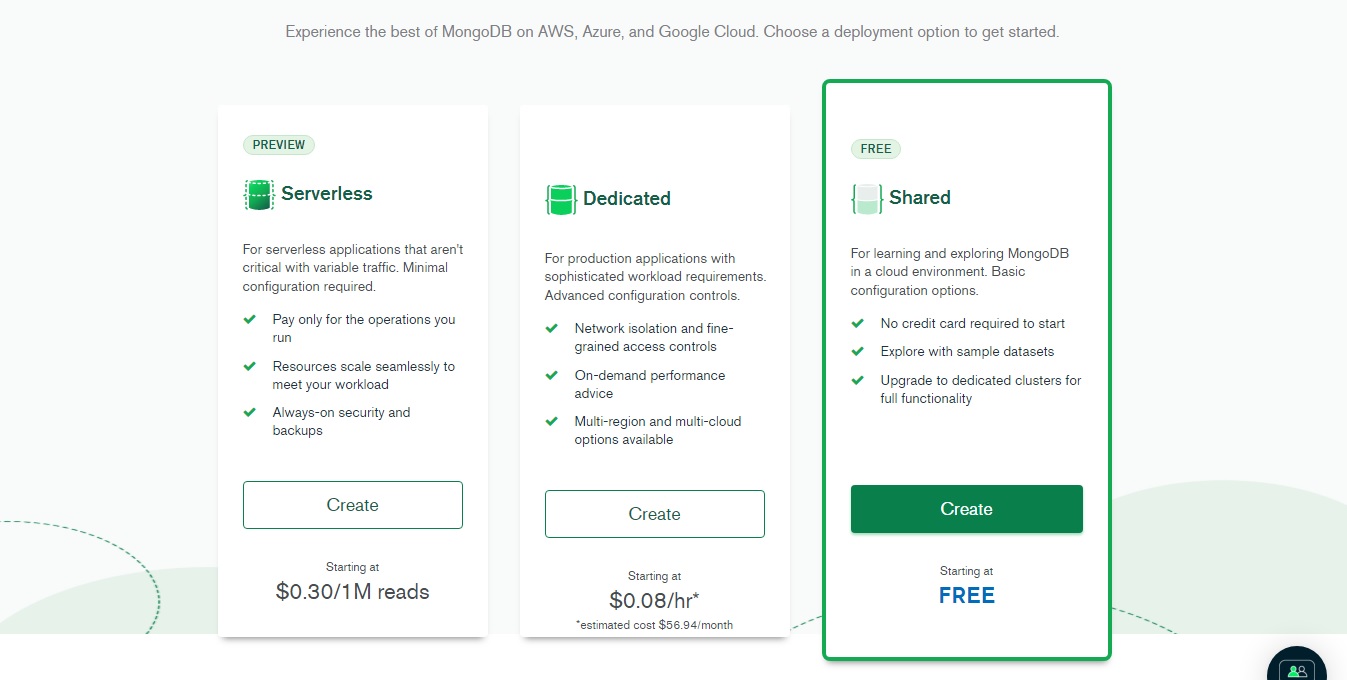
MongoDB提供三种云存储方案,分别如下:亚马逊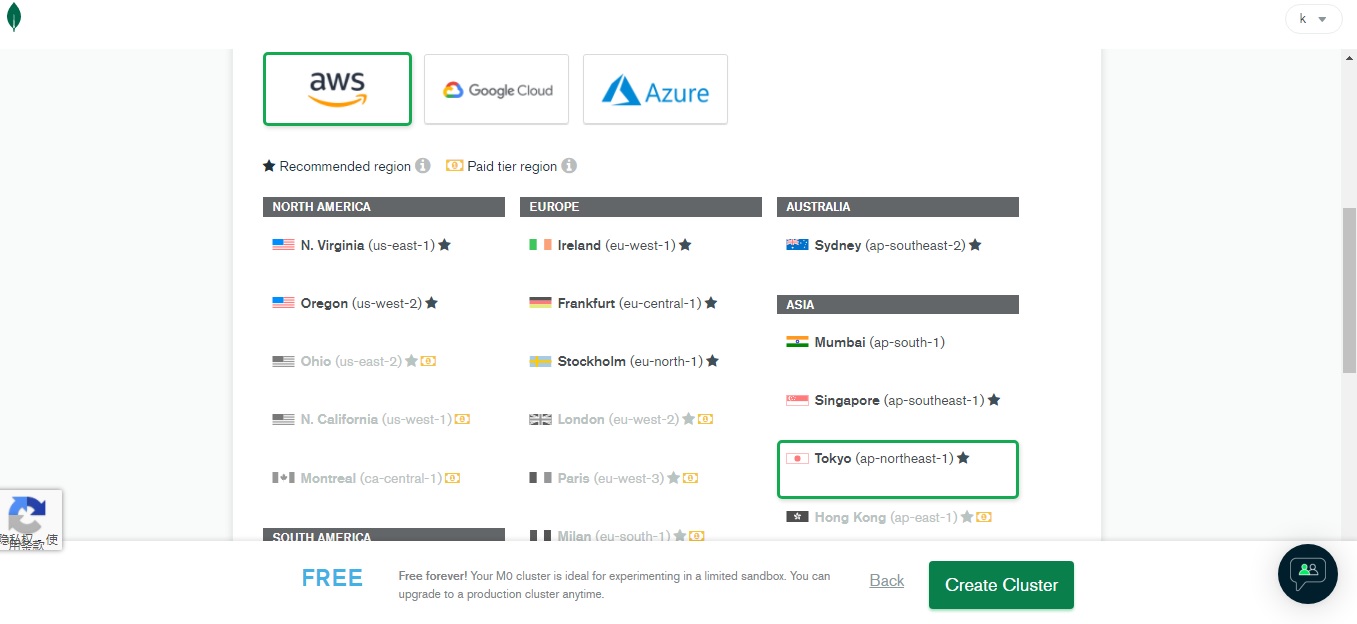
谷歌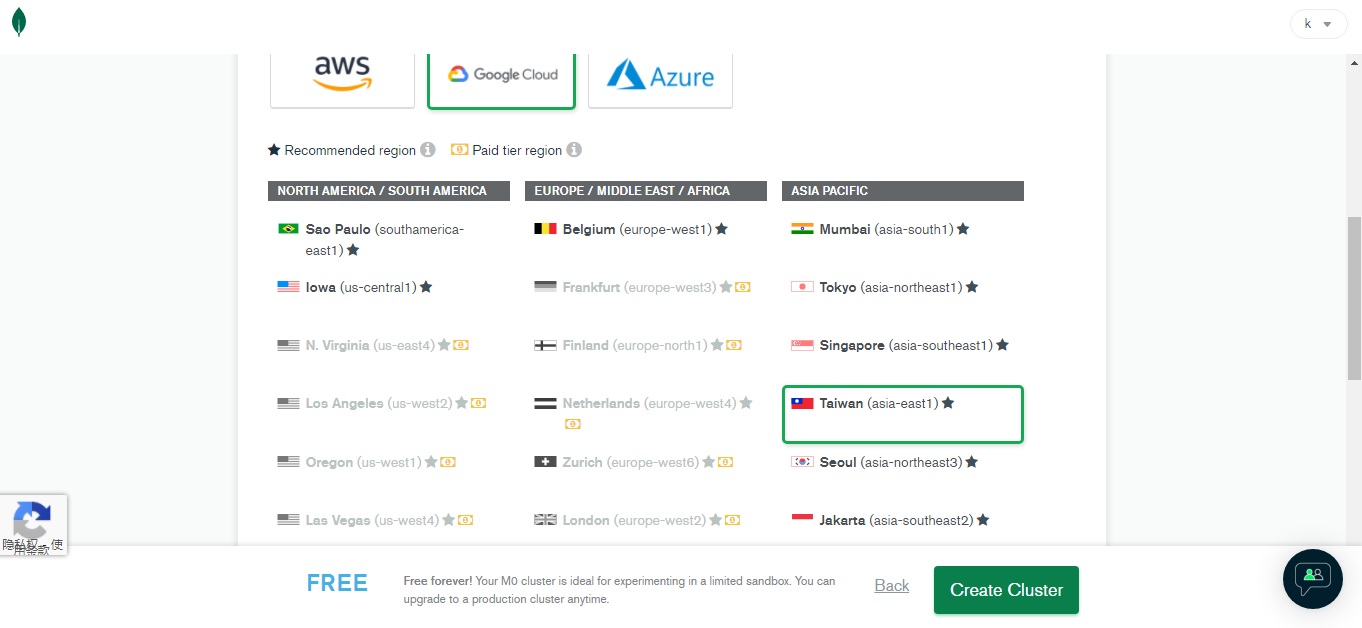
微软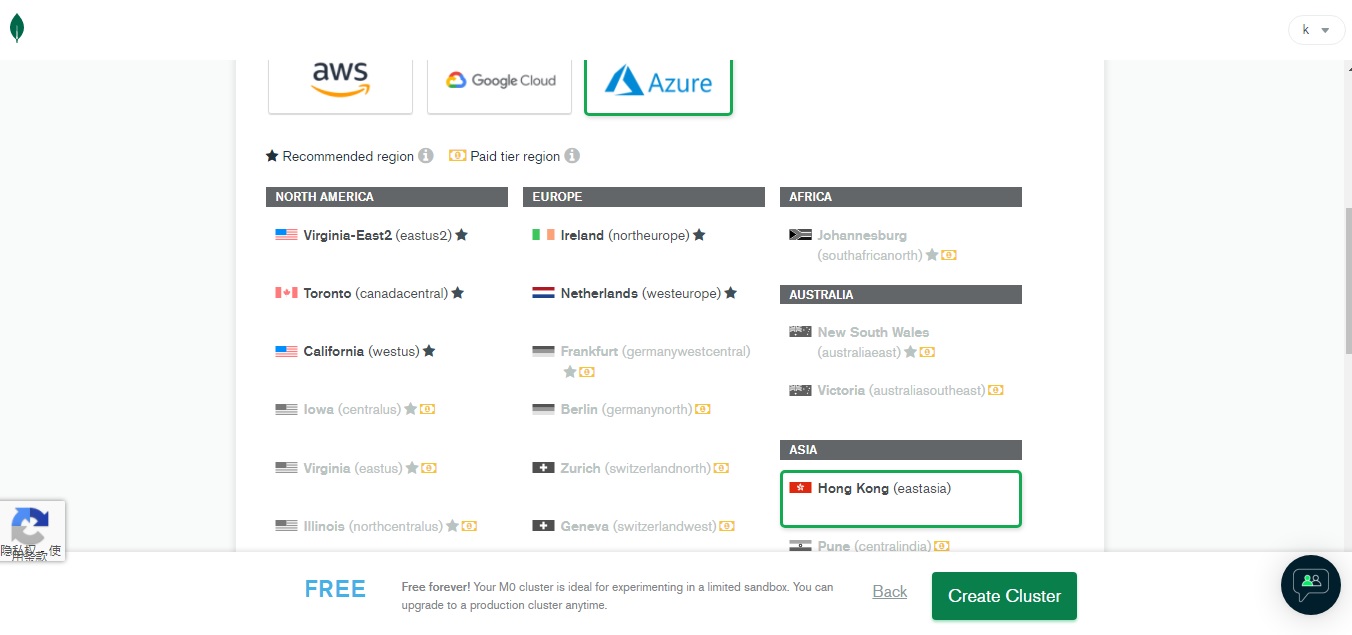
根据实际情况自己选择(本例选择Google-->taiwan)
点击Create Cluster即可.
3、设置数据库账号和密码
如下图: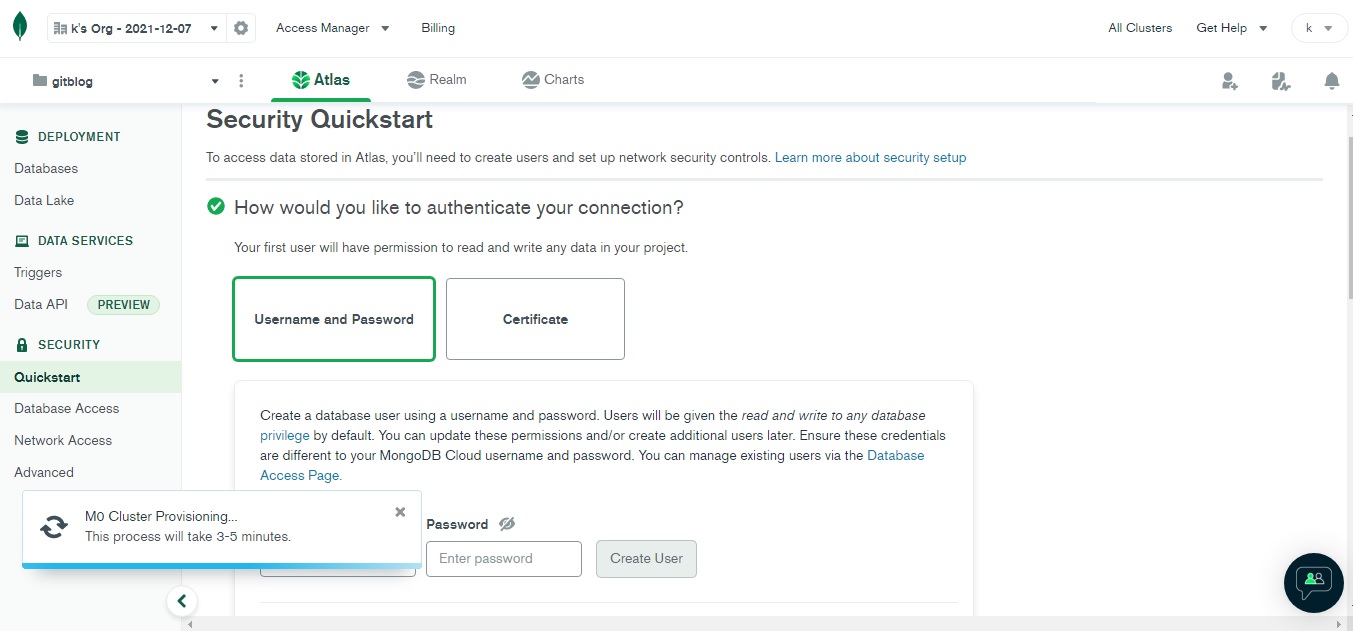
也可选选择Certificate,具体可参照提示执行。带证书的操作方式可参照[Python连接操作]中的问题解决。
4、设置进行登录数据库操作的IP地址
点击红框所示,会自动添加本机ip地址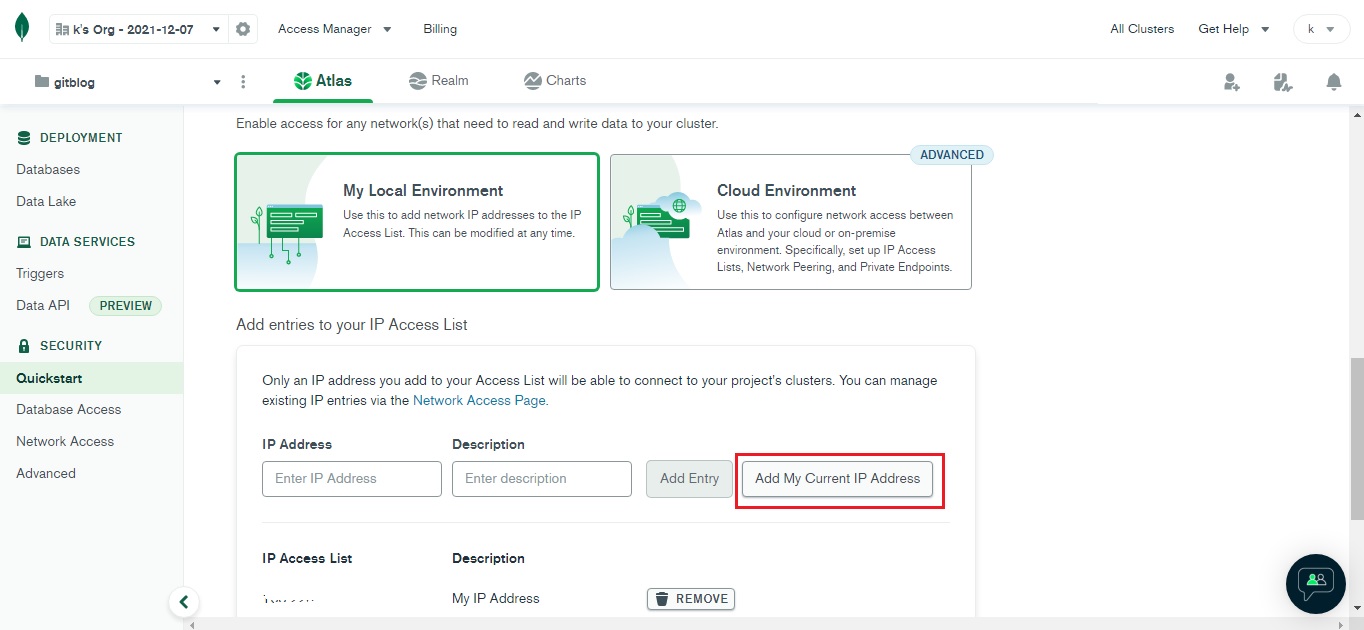
若要设置任意IP可登录操作可设置为0.0.0.0/0,Description根据所好随便填写。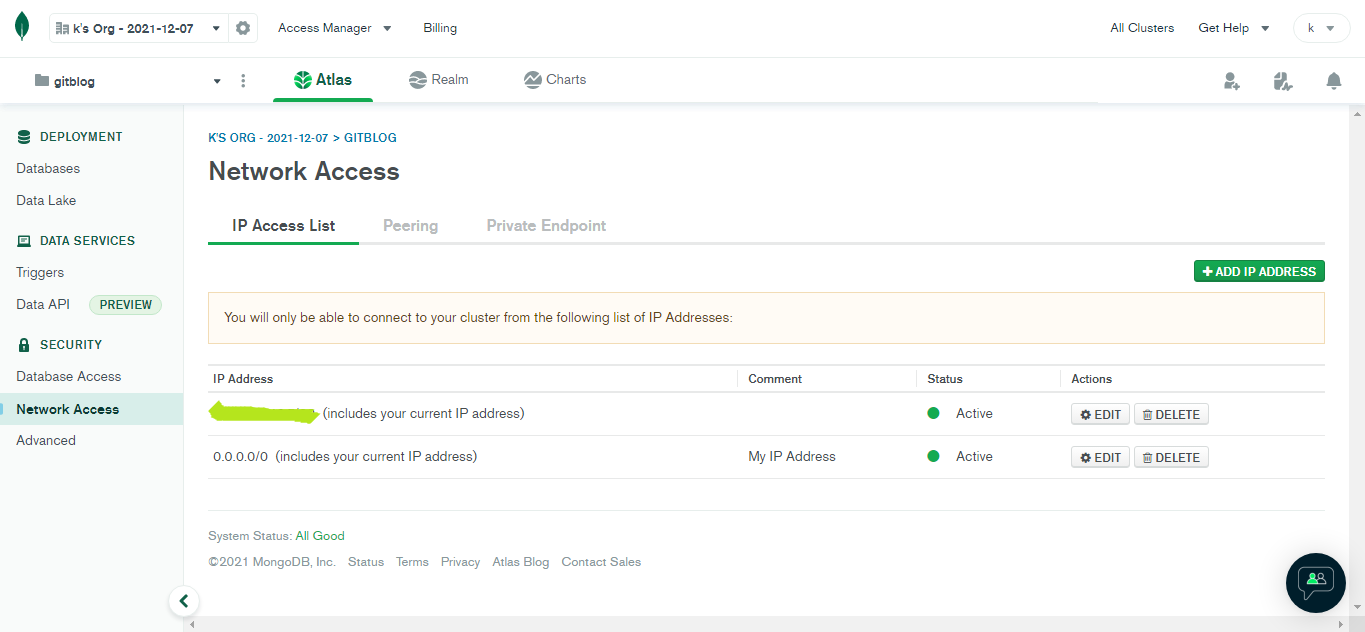
5、后续操作数据库
配置完成后,点击项目页面左侧的Databases,会出现配置上线的数据库。
可以点击右边Connect,根据提示选择相应的连接数据库方式。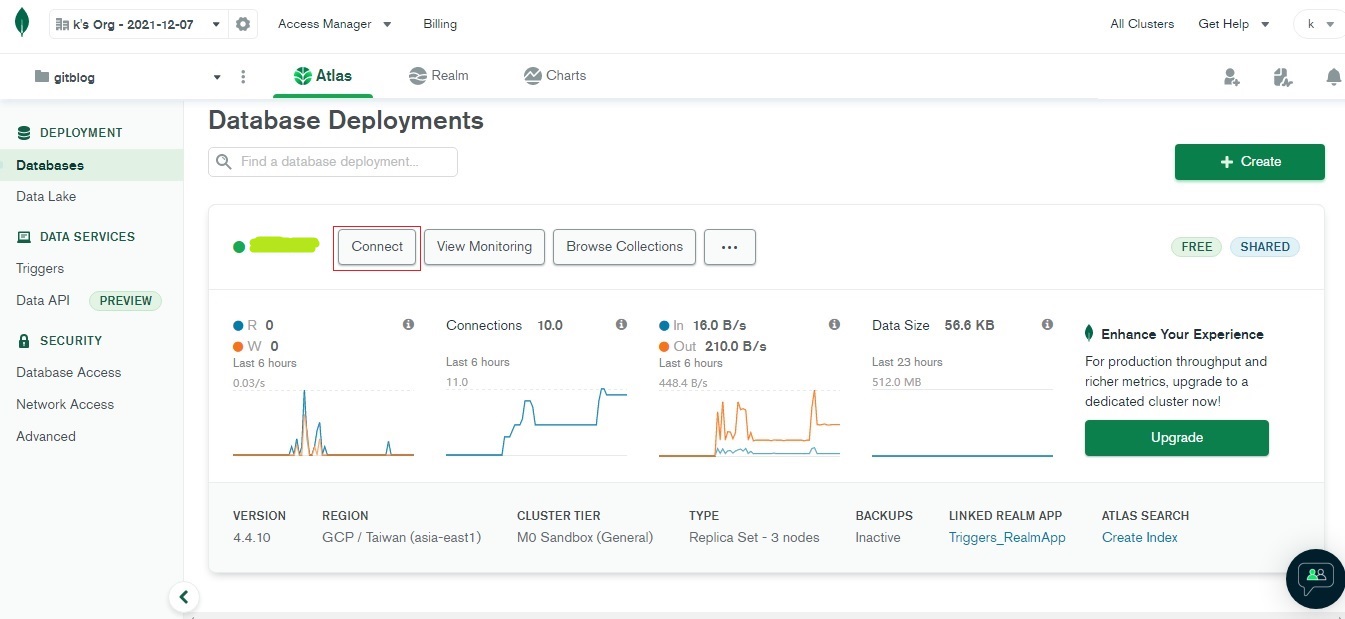
比如mongosh:1
mongosh "mongodb+srv://主机地址/数据库名" --username 你的数据库用户名
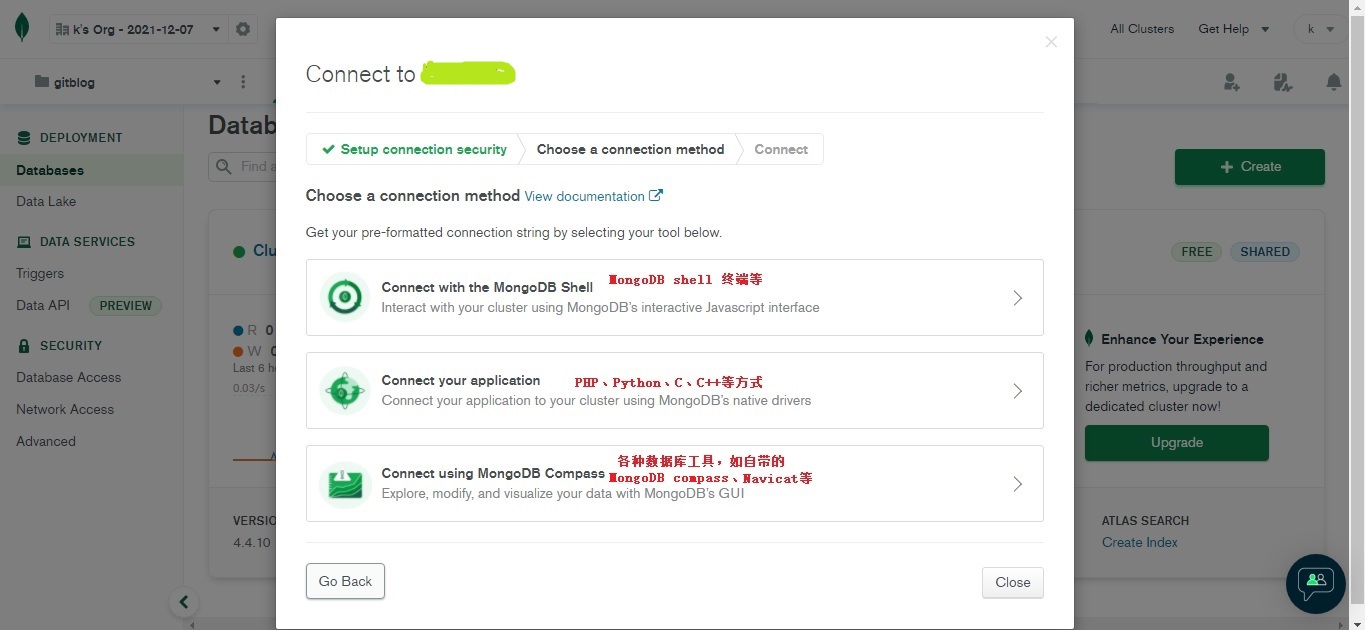
各种方式连接如下列图:
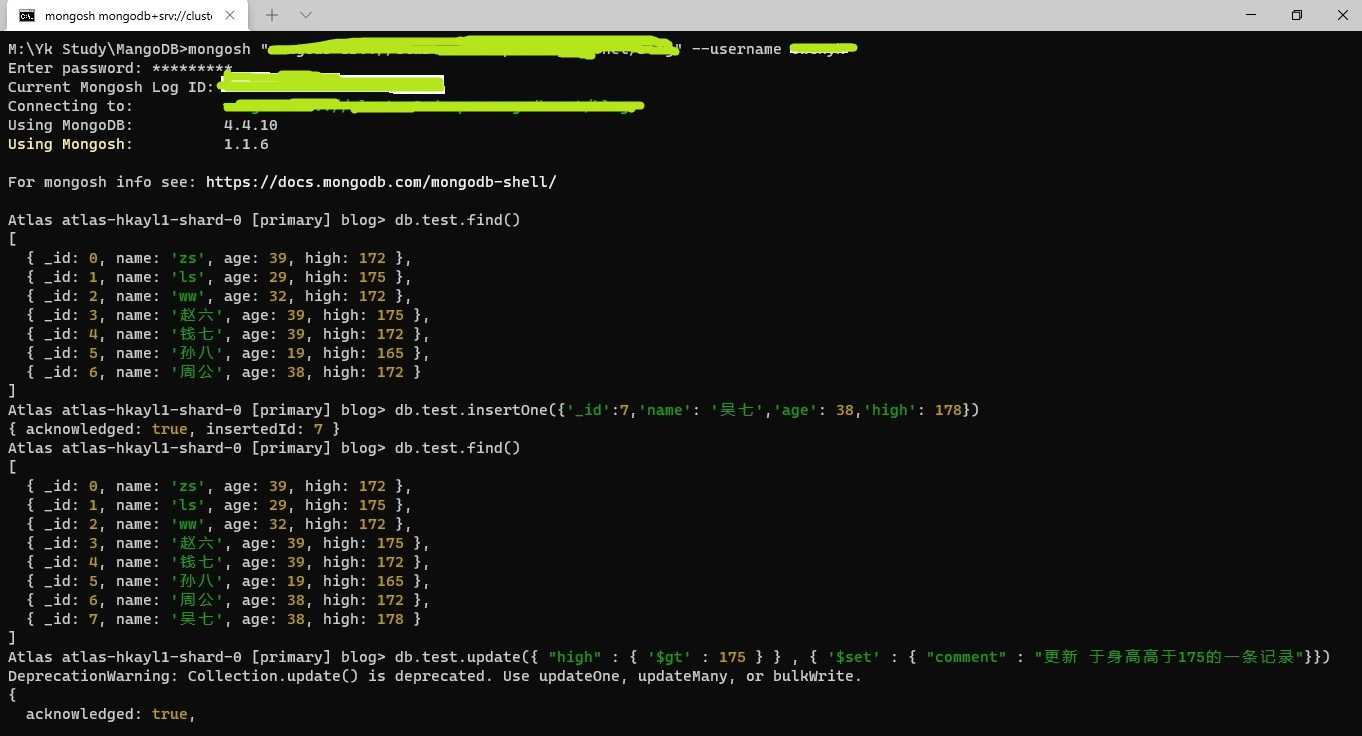
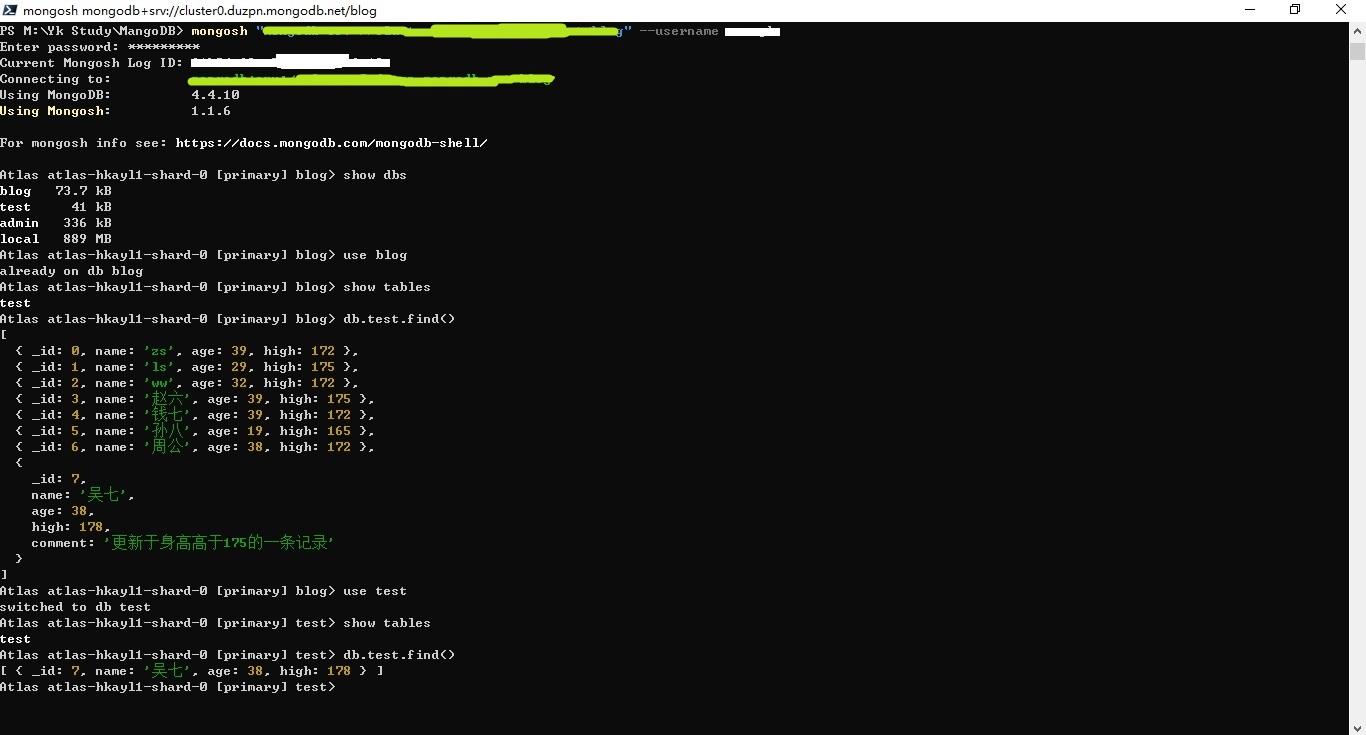
(1)Mongosh在win10上连接和操作
①登录、插入、查询
②登录、查询
(2)Mongosh在Debian11上连接和操作参数
按win10系统的参数连接会报错:pymongo.errors.ConfigurationError:The DNS operation timed out after XXXXX
解决参考方法如下【选择pymongo低版本连接参数】:1
2
3
4
5
6
7
8
9
10
11
12# 安装 mongosh
wget -qO mongodb-mongosh.deb https://downloads.mongodb.com/compass/mongodb-mongosh_1.1.6_amd64.deb
sudo dpkg -i mongodb-mongosh.deb
# 登录
$ mongosh 'mongodb://主机00.mongodb.net:27017,主机01.mongodb.net:27017,主机02.mongodb.net:27017/数据库名称?ssl=true&replicaSet=atlas-hkayl1-shard-0&authSource=admin&retryWrites=true&w=majority' --username 数据库用户名
Enter password: *********
Current Mongosh Log ID: XXXXXX
Connecting to: mongodb://主机00.mongodb.net:27017,主机01.mongodb.net:27017,主机02.mongodb.net:27017/数据库名称?ssl=true&replicaSet=atlas-hkayl1-shard-0&authSource=admin&retryWrites=true&w=majority
Using MongoDB: 4.4.10
Using Mongosh: 1.1.6
③修改
命令如下:1
2
3
4
5
6
7
8
9
10
11
12
13
14
15
16
17
18
19
20
21
22
23
24
25
26
27
28
29
30
31
32
33
34
35
36
37
38
39
40
41
42
43
44
45
46
47
48
49
50
51
52
53
54
55
56
57
58
59
60
61
62
63
64
65
66> db.test.find()
[
{ _id: 0, name: 'zs', age: 39, high: 172 },
{ _id: 2, name: 'ww', age: 32, high: 172 },
{ _id: 1, name: 'ls', age: 29, high: 175 },
{ _id: 3, name: '赵六', age: 39, high: 175 },
{ _id: 5, name: '孙八', age: 19, high: 165 },
{ _id: 6, name: '周公', age: 38, high: 172 },
{ _id: 4, name: '钱七', age: 39, high: 172 },
{
_id: 7,
name: '吴七',
age: 38,
high: 178,
comment: '更新于身高高于175的一条记录'
},
{
_id: ObjectId("61b80df04e8e73c1813dada4"),
name: '重八',
age: 29,
high: 176
},
{
_id: ObjectId("61b80e014e8e73c1813dada5"),
name: '老九',
age: 32,
high: 169
}
]
> db.test.updateOne({_id:ObjectId("61b80e014e8e73c1813dada5")},{$set:{high:168}})
{
acknowledged: true,
insertedId: null,
matchedCount: 1,
modifiedCount: 1,
upsertedCount: 0
}
> db.test.find()
[
{ _id: 0, name: 'zs', age: 39, high: 172 },
{ _id: 2, name: 'ww', age: 32, high: 172 },
{ _id: 1, name: 'ls', age: 29, high: 175 },
{ _id: 3, name: '赵六', age: 39, high: 175 },
{ _id: 5, name: '孙八', age: 19, high: 165 },
{ _id: 6, name: '周公', age: 38, high: 172 },
{ _id: 4, name: '钱七', age: 39, high: 172 },
{
_id: 7,
name: '吴七',
age: 38,
high: 178,
comment: '更新于身高高于175的一条记录'
},
{
_id: ObjectId("61b80df04e8e73c1813dada4"),
name: '重八',
age: 29,
high: 176
},
{
_id: ObjectId("61b80e014e8e73c1813dada5"),
name: '老九',
age: 32,
high: 168
}
]
(2)应用连接操作
Python连接在window10上操作
(但是实际测试不成功,一直报错)待解决。 已经解决,参照:解决方式
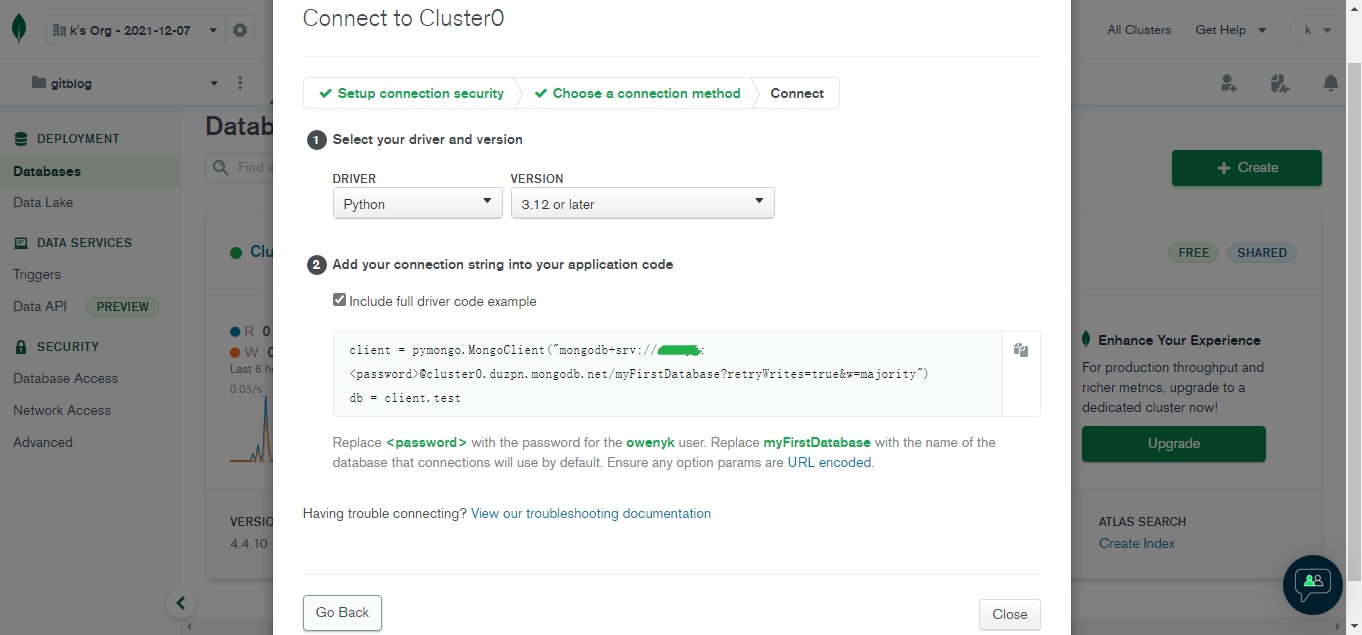
以下python连接参数版本针对python3.10&pymongo-3.12.3 参考:问题解决
查询python及pymongo版本:1
2python -V
pip show pymongo
版本驱动对应关系:MongoDB Drivers
①安装模块:
1 | pip install pymongo |
②用python操作mongodb数据库
1 | import pymongo |
但是报错如下:1
连接失败: 主机地址:27017: [SSL: CERTIFICATE_VERIFY_FAILED] certificate verify failed: certificate has expired (_ssl.c:997)以下省略。。。
解决方式:
在文件头加上import certifi, ssl,在连接参数里面加上ssl_cert_reqs=ssl.CERT_NONE,代码如下:1
2
3
4
5
6
7
8
9
10
11
12
13
14
15
16
17
18
19
20
21
22
23
24
25
26
27
28
29
30
31
32
33
34
35
36
37
38
39
40
41
42
43
44
45
46
47
48
49
50
51
52
53
54
55
56
57
58
59
60from pymongo import MongoClient
# import datetime
import certifi, ssl
###########
# 使用X.509证书连接
###########
certPath = certifi.where().replace("\\","/") # 查询ssl证书路径,下面参数`ssl=True`时需要验证证书路径
uri = "mongodb+srv://主机地址/数据库名?authSource=%24external&authMechanism=MONGODB-X509&retryWrites=true&w=majority"
## 带ssl证书参数
print("------要求ssl证书验证------")
client = MongoClient(uri,
ssl=True,
ssl_ca_certs=certPath,
tls=True,
tlsCertificateKeyFile=r'X509-cert-路径\证书名.pem')
## 不要求验证ssl证书
# print("------不要求ssl证书验证------")
# client = MongoClient(uri,
# ssl_cert_reqs=ssl.CERT_NONE,
# tls=True,
# tlsCertificateKeyFile=r'X509-cert-路径\证书名.pem')
db = client['要操作的数据库名']
collection = db['要操作的数据库下的数据集']
doc_count = collection.count_documents({})
print("在该数据集下共有:",doc_count,"条数据")
###########
# 使用账号和密码连接
###########
host = "主机地址"
user = "数据库用户名"
passwd = "数据库用户密码"
db_name = "要操作的数据库名"
set_name = "集合名"
uri = 'mongodb+srv://'+user+':'+passwd+'@'+host+'/'+db_name+'?retryWrites=true&w=majority'
try:
## 设置连接超时5秒
## 添加ssl证书路径参数,`print(certifi.where())`可输出ssl证书路径
print("------要求ssl证书验证------")
client = MongoClient(uri, ssl_ca_certs= certPath, serverSelectionTimeoutMS=5000)
## 不请求验证证书
#print("------不要求ssl证书验证------")
# client = MongoClient(uri, ssl_cert_reqs=ssl.CERT_NONE, serverSelectionTimeoutMS=5000)
# print(client)
# print("所存在的数据库有:", client.list_database_names())
dbs = client["数据库名"]
mydbs = dbs["数据集名"]
print("数据库连接成功")
for mydb in mydbs.find():
print(mydb)
except Exception as e:
print("连接失败:",e)
finally:
client.close()
最终结果如图: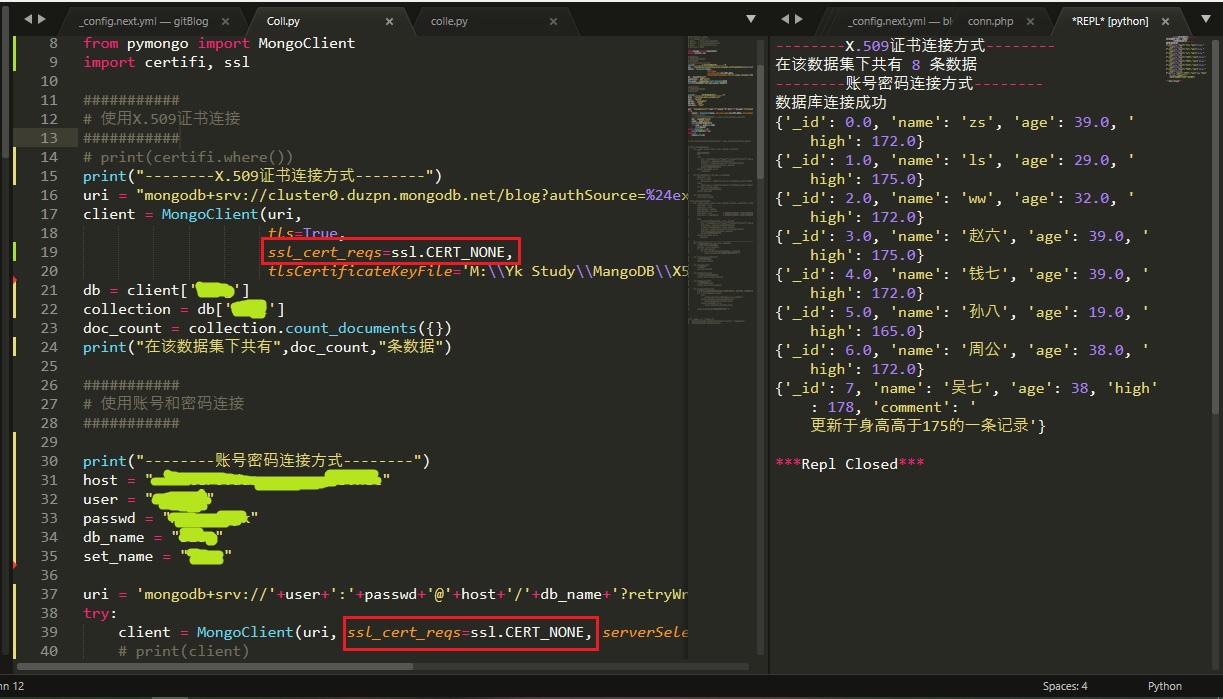
Python连接在Debian11上操作
== python FOR debian==
按win10系统的参数连接会报错:pymongo.errors.ConfigurationError:The DNS operation timed out after XXXXX
解决办法,更改驱动版本连接参数:pymongo驱动程序版本3.4+链接字符串【参数在MongoDB网站项目数据库连接选项里可查到】大体如下:1
2uri = 'mongodb://数据库用户名:数据库用户密码@主机00.mongodb.net:27017,主机01.mongodb.net:27017,主机02.mongodb.net:27017/数据库名称?ssl=true&replicaSet=atlas-hkayl1-shard-0&authSource=admin&retryWrites=true&w=majority'
# print(uri)
其他事项
如果升级pymongo到最新4.0.1版本会提示:mongoengine 0.23.1 requires pymongo<4.0,>=3.4, but you have pymongo 4.0.1 which is incompatible.
用python接数据库会提示:1
2
3
4
5连接失败: Unknown option ssl_cert_reqs
Traceback (most recent call last):
File "XXXX.py", line 79, in <module>
client.close()
NameError: name 'client' is not defined`
将pymongo降级到3.12.3即可:1
pip install -U pymongo==3.12.3
nodejs连接操作
安装支持模块
1 | npm i mongodb |
nodejs连接并执行查询
新建node-conn.js文件,代码内容如下:1
2
3
4
5
6
7
8
9
10
11
12
13
14
15// 连接并查询
const mongoclient = require("mongodb").MongoClient;
const uri = "mongodb+srv://数据库名:数据库用户密码@主机地址/数据库名?retryWrites=true&w=majority";
mongoclient.connect(url, function (err, client) {
client.db("blog").collection("test").find({}).toArray().then(function (result) {
result.forEach(function (value,index,arr) {
// console.log(value); //第一个参数是 遍历数组的元素,
// console.log(index); // 第二个参数是 元素的位置,
// console.log(arr); // 第三个参数是 整个数组的值。
console.log(value._id,value.name,value.age,value.high,value.comment);
});
}, function (err) {
console.log(err.message);
})
});
输入命令node node-conn.js执行查询,结果如下:1
2
3
4
5
6
7
8
9node node-conn.js
0 zs 39 172 undefined
1 ls 29 175 undefined
2 ww 32 172 undefined
3 赵六 39 175 undefined
4 钱七 39 172 undefined
5 孙八 19 165 undefined
6 周公 38 172 undefined
7 吴七 38 178 更新于身高高于175的一条记录
(3)Navicat连接和操作
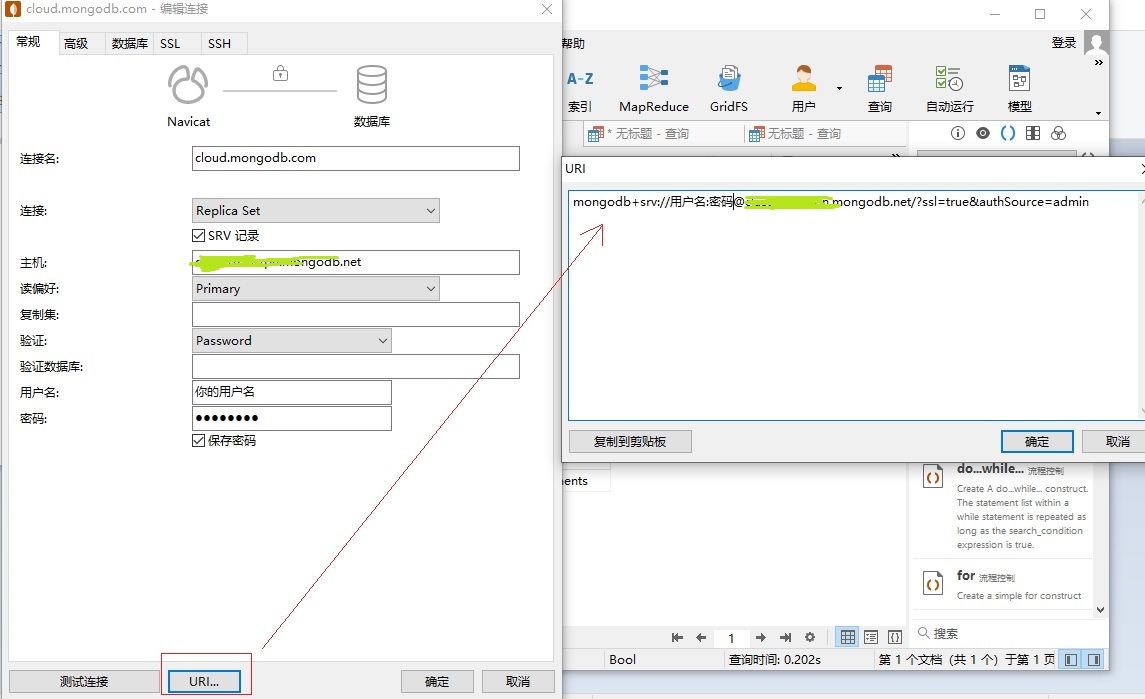
登录
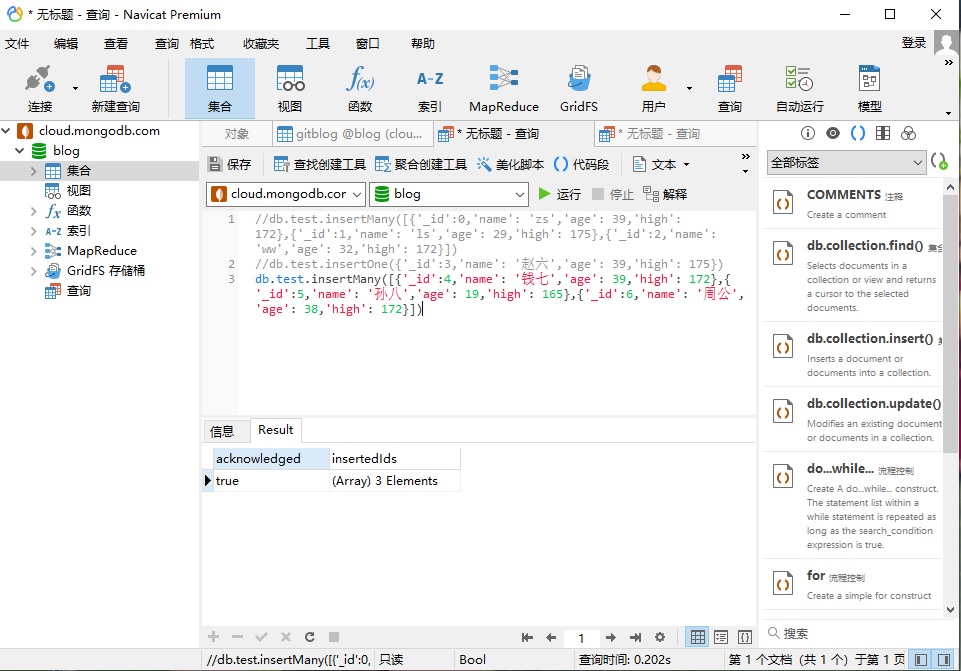
插入
查询

一些参考资料:
1、MongoDB驱动程序的应用程序
2、TLS/SSL and PyMongo
3、安装 MongoDB PHP 库
4、驱动版本兼容性
5、mongoose模块
6、node.js Quick Start
7、pymongo 4.0.1